Recently at work I checked out a co-workers Vivado project that was under review. Instead of putting all of the project files in SVN they only put the source files, constraints, IP files, and a Tcl script that re-created the project. Overall it worked pretty well. However, there was just one catch, Vivado reported that one of the IP files under source control was generated using a different version of Vivado than the one currently being used. Oddly enough, the version numbers matched but I still had to regenerate the IP before the warning would go away.
I later learned that the team using this project spent two weeks trying to find a bug that was only present on hardware. The culprit, Vivado IP being out-of-date. I wish I could say this was an isolated case but I’ve experienced this first hand on other projects. Somehow the IP files are corrupted under source control or are not properly updated causing difficult to find bugs. So, like a gritty engineer, I decided to find a better solution that would allow for consistent IP setup.
Two Approaches
Vivado supports two methods that yield superior results and both rely on Tcl. The first approach allows you to create Vivado IP from scratch using Tcl. This means that there is no .xci file to store under source control, instead, it is a Tcl script. There are a few of advantages:
- It is simple to see changes between versions in source control
- IP is created using the current version of Vivado
- If the IP already exists then the Tcl script skips generating the IP
The second method requires the .xci file to be stored under source control. A Tcl script checks if the IP is locked and if a new version of the IP is available. If the IP is locked and a new version is available then the Tcl script updates the .xci file. Once the IP is determined
- IP is not regenerated if not needed
- The scripting is slightly easier than generating the IP from scratch
- Updating IP is slightly faster than creating IP from scratch
The main disadvantage to this approach is that you can’t easily see changes made to the .xci files. If this is a mature project that is unlikely to experience changes in the IP then it’s not an issue. However, many projects are in flux and occasionally engineers must make updates to the IP. When this is the case, using Tcl scripts to build the IP from scratch is advantageous.
Get Vivado IP Tcl commands from the GUI
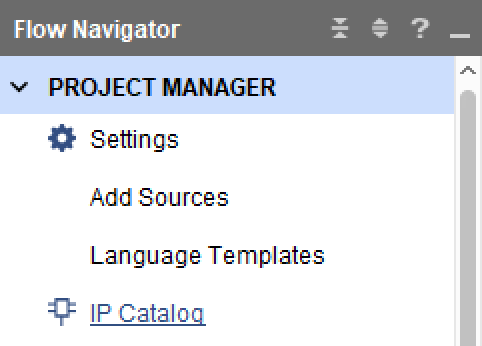
As with most things there’s an easy way and a hard way to create IP. I prefer the easy way unless there’s a strong incentive otherwise. The easy way is to create the IP using the Vivado GUI and then capture the Tcl commands generated in the journal file (.jou). For this example, we’ll create a fixed point to floating point IP block. In the Flow Navigator under Project Manager select the IP catalog.
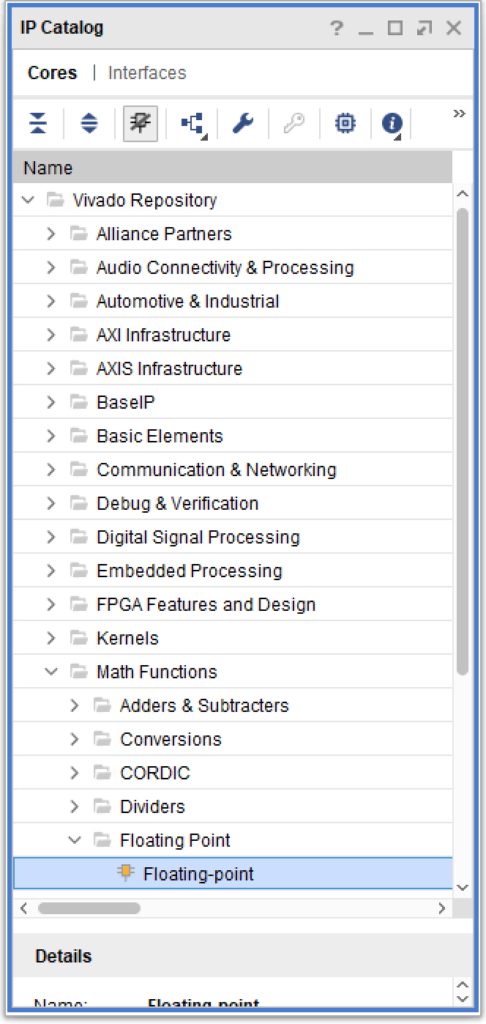
In the IP catalog window select Cores and then Vivado Repository>Math Functions>Floating Point>Floating-point.
A Customize IP window appears and you can specify a component name in the “Component Name” box. Here I have given the component name sfix_19_16_to_float32. Under the “Operation Selection” tab select “Fixed-to-float”. Select the “Precision of Inputs” tab and select whatever input precision suites your fancy. I opted for a custom input precision with an integer width of 19 bits and fractional width of 16 bits. Check each of the remaining tabs to make sure the IP is generated with the correct settings. Click “OK”. Finally, in the Generate Output Products window select “Generate”.
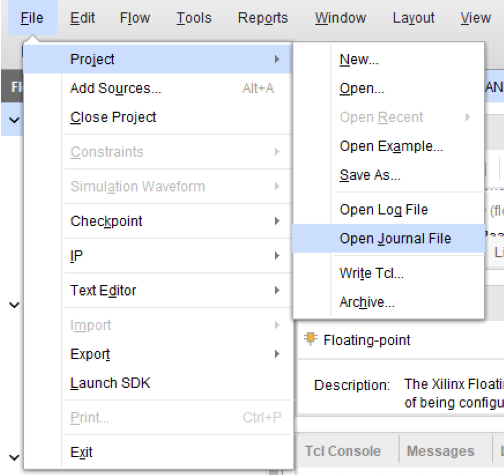
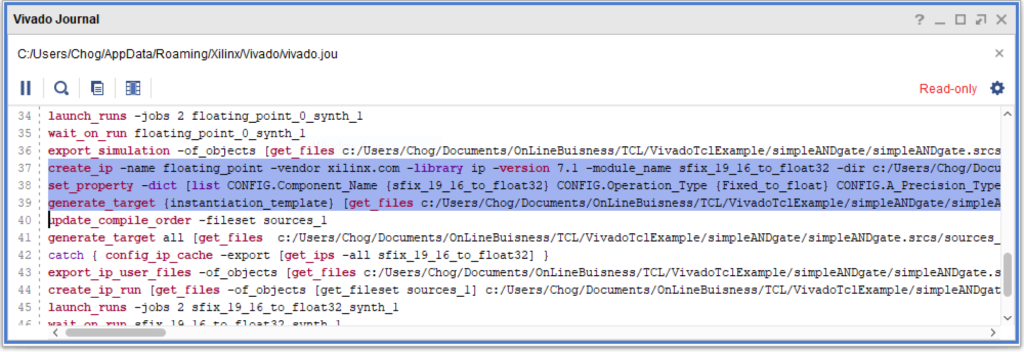
Now that we have created the Vivado IP it’s time to capture the corresponding Tcl commands. Open the journal file by going to File>Project>Open Journal File. In the Journal file, you’ll see a number of Tcl commands but we’re interested in three. The commands start with create_ip, set_property, and generate_target. If done correctly, these three commands are executed sequentially. The create_ip command has an argument called -module_name <userDefinedName>. The userDefinedName should match the name you gave the component.
Approach one: Adding Vivado IP Tcl commands to Non-Project mode script
Before we go further we need to establish the assumed directory structure. A common directory structure is shown below. The source control tool contains the parent folder Root. It also contains the sub-folders: Constraints, RTL, Sim, and TclScripts. The IP folder is not stored in source control but is created by the Tcl script. The IP sub-folder stores the .xci files and all output products of the .xci files.
Root
    - Constraints
    - RTL
    - Sim
    - TclScripts
    - IP
Now it’s time to put the three Vivado IP Tcl commands into our Tcl scripts. For the purposes of this article, I’m assuming you are using Vivado in Non-Project mode. If not, check out the tutorial here. In a Non-Project mode Tcl script there is a command called read_ip. Typically, this command comes after reading the source and constraints files. Instead of reading in the .xci file using the read_ip command we’re going to use a simple if statement to check whether or not the IP folder exists (for tutorials on Tcl if statements and what the brackets are for click here and here). The reason is that when the design is first checked out from source control there is no IP folder and no .xci files so we want to create them for the first time. However, once created we don’t want to go through the process of recreating the folder and .xci files every time the script is executed.
# Check IP
if { [file isdirectory ../"IP"] } {
    # if the IP files exist, we already generated the IP, so we can just
    # read the ip definition (.xci)
    read_ip ../IP/sfix_19_16_to_float32.xci
} else {
    # IP folder does not exist. Create IP folder
    file mkdir ../IP

    # create_ip requires that a project is open in memory. Create project
    # but don't do anything with it
    create_project -in_memory

    # paste commands from Journal file to recreate IP
    create_ip -name floating_point -vendor xilinx.com -library ip \
        -version 7.1 -module_name sfix_19_16_to_float32 \
        -dir ../IP

    set_property -dict [list CONFIG.Component_Name {sfix_19_16_to_float32}\
        CONFIG.Operation_Type {Fixed_to_float} CONFIG.A_Precision_Type {Custom} \
        CONFIG.C_A_Exponent_Width {19} CONFIG.C_A_Fraction_Width {16}\
        CONFIG.Maximum_Latency {false} CONFIG.C_A_Fraction_Width {16}\
        CONFIG.Result_Precision_Type {Single} CONFIG.C_Result_Exponent_Width {8} CONFIG.C_Result_Fraction_Width {24}\
        CONFIG.C_Accum_Msb {32} CONFIG.C_Accum_Lsb {-31}\
        CONFIG.C_Accum_Input_Msb {32} CONFIG.C_Mult_Usage {No_Usage}\
        CONFIG.C_Latency {8} CONFIG.C_Rate {1}] [get_ips sfix_19_16_to_float32]

    generate_target all [get_ips]

    # Synthesize all the IP
    synth_ip [get_ips]
}
For the purposes of this tutorial, I wrapped the commands across multiple lines by using the escape operator, \, on the carriage return. This is solely for readability and not necessary. Note: you must change where the IP is stored when using the create_ip command. I modified the -dir argument to point to the newly created IP folder.
Approach two: Store xci files and check for updates
For the second approach, we will use the IP fixed-to-float conversion IP created earlier. We assume the directory structure below. In this case, the only folder not under source control is BuildFiles.
Root
    - Constraints
    - RTL
    - Sim
    - TclScripts
    - IP
        - sfix_19_16_to_float32.xci
    - BuildFiles
        - sfix_19_16_to_float32
            - sfix_19_16_to_float32.xci
To make things cleaner we avoid storing output files/build files inside of directories under source control. For that reason, inside of TclScripts we store a script that creates the BuildFiles directory and copies each of the .xci files stored in IP into their own subfolder within BuildFiles. The .xci files are copied into their own subfolders because if a single folder contains all of the .xci files then problems occur generating the IP output products. Vivado stores the IP output files in the same location as the .xci files and existing IP output products may be overwritten.
There are five steps when reading in .xci files for the first time.
- Read in IP using the read_ip command
- Check to see if the IP is locked and store the result in a Tcl variable
- Check to see if the IP contains an upgrade and store the result in a Tcl Variable
- If the IP is locked and an upgrade is an available upgrade the IP
- Generate the IP output products
The script below shows the proper Vivado IP Tcl commands.
#Step 1: Read in IP
read_ip ../IP/sfix_19_16_to_float32/sfix_19_16_to_float32.xci

#Step 2: Check if IP is locked
set locked [get_property IS_LOCKED [get_ips sfix_19_16_to_float32]]

#Step 3: Check if upgrade is available
set upgrade [get_property UPGRADE_VERSIONS [get_ips sfix_19_16_to_float32]]

#Step 4: Upgrade IP if required
if {$locked && $upgrade != ""} {
upgrade_ip [get_ips sfix_19_16_to_float32]}

#Step 5: Produce IP output products
generate_target all [get_ips sfix_19_16_to_float32]
For more information check out the Vivado guide UG939.
Conclusion
How do you generate and store your Vivado IP? Let us know in the comments section. All comments are read and appreciated. As a bonus, we’ve included our Tcl script that creates the BuildFiles

Hi,
Very nice article, I’ve a couple questions:
1) Don’t you need to execute steps 2 to 5 in the first case as well once it has done the read_ip command cause it existed already?
2) Don’t you need to store each xci inside it’s own folder as well? or build the tcl to produce it inside it’s own folder?
Cheers,
Luis
Thanks! That’s a good question Luis.
1) The first case assumes that the .xci files were created recently using the Tcl commands inside of the else statement. It would then be unnecessary to check each time if the IP was locked and if there was a new one available. That being said, it won’t hurt anything executing steps 2 to 5 in the if portion of the statement.
2) The Tcl commands in the first approach automatically generate the .xci files inside their own folders. Vivado handles that for us :). In the second approach, you’d need to create subfolders inside BuildFiles directory and copy the .xci files into the newly created subfolders. That’s what the free Tcl script at the bottom of the post does. It copies the .xci files from the IP folder and stores them in their own subfolders inside of the BuildFiles directory.
Was I able to answer your questions?
Hi,
Thanks for the valuable sharing.
I have two questions regarding your example in case 1.
Q1:
In the figure of Capture Vivado IP Tcl commands in Journal file, line 39 is generate_target [instantiation template [get_file…]. However, in the script of test 1, the code you posted is as follows :
generate_target all [get_ips]
Is it a typo?
Q2: Is it possible to use non-project mode for IP connection? For example, for the generated IP with only AXI bus interface, is it possible to integrate with processing subsystem IP with non-project mode tcl commands instead of manually connection in GUI each time?
Many thanks in advance.
Thanks Nan, hopefully, you can share it with coworkers and such 🙂
A1: The command in the Journal file on line 39 will work but it only generates the .xci file for the specific IP in question. If you had 3 IP cores that you needed to generate you’d have to have the generate_target command 3 times, once for each IP. get_ips returns all of the IP cores added to the design. generate_target all will generate the .xci files for all IP cores, thus you’d only need one command instead of 3.
A2: I think it is possible to do what you’re asking using Tcl commands but I have not done it personally. I wish I could be of more help on this one but if you figure it out leave a comment. Or, if you’d like, you could submit a tutorial on how this is accomplished.