Have you ever thought that a task should just be simple? For example, a co-worker might ask you to review portions of their project so you check out their project from SVN or Git. However, for some reason, you can’t just simply hit generate bitstream or launch the simulations because something went wrong. It could be the fact you use a different version of Vivado, one of the IP files is corrupted, or something else entirely and you have to spend a couple of hours trying to figure it out. Does this sound familiar to anyone or is it just me?
Luckily there is a better way. Instead of checking in all of the project files and source files it’s more efficient to simply check in a Tcl script along with the source files that builds the Vivado project. There are a number of benefits to doing this. First, because Tcl is just a text file you can easily track changes between different versions under source control. Second, the Tcl script can be run on different versions of Vivado making it more robust. Third, it allows for repeatability making project distribution between team members much easier. I highly recommend using Tcl scripts to setup and maintain your Vivado projects, espectially when working in teams and using source control.
This post goes over a simple, generic Tcl script that can be used as a starting point for your project. If looking for more details consider looking at Xilinx Vivado Design Suite User Guide: Using Tcl Scripting (UG894).
Create Project Directory
The first step is to define and create the output directory where the project is to be created. If the directory already exists then file mkdir returns without doing anything. Personally, I think it’s good practice to clear the contents of the directory to make sure there are no other projects or miscellaneous files. Once the directory is known to be clear, create the Vivado project.
#Create output directory and clear contents
set outputdir ./path/to/project
file mkdir $outputdir
set files [glob -nocomplain "$outputdir/*"]
if {[llength $files] != 0} {
    puts "deleting contents of $outputdir"
    file delete -force {*}[glob -directory $outputdir *]; # clear folder contents
} else {
    puts "$outputdir is empty"
}

#Create project
create_project -part partNumber projectName $outputdir
Notice that create_project is not color coded. This is because create_project is not a built-in Tcl command but is a procedure (basically a Tcl function) defined in the Vivado namespace.
Add Source Files
The next step is to include all of the source HDL source files for the project. This includes the VHDL, verilog, IP, and constraint files required to build the project. There are two commands that can be used, the add_files and import_files commands. The add_files command references the specified file whereas the import_files creates a copy of the file and stores it in the local project folders. The optional parameter -fileset defines the fileset the file is added to. If the fileset is not specified then the files are automatically added to the source fileset.
#add source files to Vivado project
add_files -fileset sim_1 ./path/to/testbench.vhd
add_files [glob ./path/to/sources/*.vhd]
add_files -fileset constrs_1 ./path/to/constraint/constraint.xdc
add_files [glob ./path/to/library/sources/*.vhd]
set_property -library userDefined [glob ./path/to/library/sources/*.vhd]
The glob command returns all of the files within the specified file path matching the file pattern. In this example we use the wild card character, *, before the file extension to return all the files with a .vhd extension. The last line in the example defines the library the files should reference. Note: you must add the files to the project before setting the library parameter.
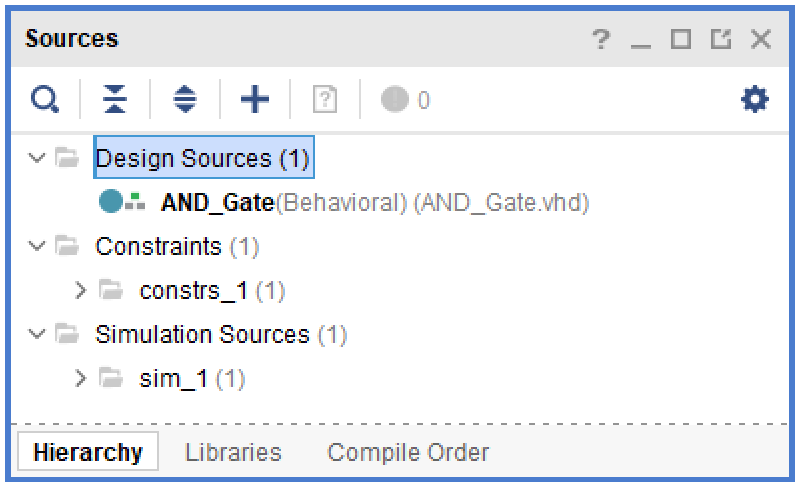
In Vivado, there are three filesets created by default: sources, constrs_1, and sim_1 as shown in the figure below. Filesets group files based on purpose, thus the source_1 fileset contains all the verilog and vhdl source files for synthesis, the constrs_1 fileset contains all of the .xdc files, and the sim_1 fileset contains your testbench for your project.
Set Top Module
Next, we need to set the top level module and update the compile order for each fileset.
#set top level module and update compile order
set_property top nameOfTopModule [current_fileset]
update_compile_order -fileset sources_1
update_compile_order -fileset sim_1
The set_property command is setting the module specified in nameOfTopModule to top for the current fileset (use the name of the top module not the file the top module is defined in).
Launch Synthesis
After setting the top module and updating the compile order we are ready to launch synthesis.
#launch synthesis
launch_runs synth_1
wait_on_run synth_1
The launch_runs command launches the synthesis run named synth_1. A synthesis run defines the constraint file to be used in synthesis, the strategy employed, and the Xilinx part being targeted. You’ll notice that in this tutorial we did not create a unique run, instead we are using the default run named synth_1. The default run targets the part defined in the project, uses the current active constraint file, and uses the Vivado default synthesis strategy. If desired, you can create custom run strategies by using create_run.
Because launch_runs launches a Vivado process in the background to perform synthesis, we must use the wait_on_run command to wait until the process is finished before preceding.
Generate Bitstream
Finally, it’s time to implement the design and create the bitstream.
#Run implementation and generate bitstream
set_property STEPS.PHYS_OPT_DESIGN.IS_ENABLED true [get_runs impl_1]
launch_runs impl_1 -to_step write_bitstream
wait_on_run impl_1
puts "Implementation done!"
The optional physical optimization step is turned on using the set_property command for the run named impl_1. impl_1 is the default implementation run. Just like with synthesis runs, custom implementation runs can be defined using the creat_run command. The optional parameter -to_step tells the tool to run through the write_bitstream step and then stop. The bit file will be named topModuleName.bit and found in path/to/project/prjName.runs/impl_1.

‘”Notice that create_project is not color coded”
There’s no create_project call in your script
Great catch. I’ve updated the post. I can’t believe we left out the most important step.
Can the project mode script convert to non-project mode ?
There is no automatic way to convert between the two modes. Personally, I don’t think switching from Project mode to Non-Project mode is all that difficult. You just need to understand Tcl syntax, luckily you know of a website that goes over Tcl syntax 🙂
Hi CHRISTOPHER,
Good tutorial and content. Just wanted to add a comment.
One of the issues about build.tcl I experienced is Xilinx IP revision and version differences. For example in Vivado 2016.1 version the clk_wiz IP of Xilinx is v5_3. In Vivado 2020.1 it is v6_0. The xci files you need to generate the output products for the IP are different for each revision and if you use different versioned IP with your Vivado version, the IP is locked.
In order to overcome I updated .xci files that are used to create my Vivado project and add them in build.tcl with the correct versions found in C:/Xilinx/Vivado/xxxx.y/data/ip/xilinx folder.
Have you ever experienced such difficulty and if yes how you overcome?
Regards,
Hi Burak,
Thanks for reading and I’m glad you left a comment. I created a tutorial about building Vivado IP through Tcl to avoid the issue you’re talking about called, Creating Vivado IP the Smart Tcl Way (you can just click on that title as I made it a hyperlink). Let me know if that works for you or if I misunderstood your issue.
Hi,
How can we add a systemverilog file with .sv extension as a import file in another file?
what is the tcl command for it?